I asked several subscribers of my blog what they would like to read about and I received the following request.
The question being: How to exercise with bad knees?
This article will cover a few aspects of bad knees, the anatomy & physiology behind bad/sore knees and some tips on how you might improve your knees to allow you to continue or begin an activity that you have previously been unable to undertake due to excessive knee pain.
ANATOMY OF THE “BAD” KNEE:
There are several stages of knee degeneration that depending upon the severity respond positively to exercise (and weight loss if needed).

HEALTHY KNEE CARTILAGE
You can expect full range of motion without pain, no grinding/crunching sounds upon moving the joint through a range of motion (eg squatting, lunging, stepping up/down stairs).
As knee joint degeneration starts to kick in (maybe even some mild Osteoarthritis (OA)) you can expect the following joint changes.

Stage 1 – MILD KNEE CARTILAGE DEGENERATION (OA)
Tissues that may be affected include: Bone, cartilage, synovial fluid
- Cartilage breakdown has begun
- Bone Spurs may form around base of meniscus
- Synovial fluid levels have decreased and ROM maybe compromised
The effect upon physical activity can include loss of ROM, pain during squatting, walking up and/or down stairs and potentially some grinding/crunching during knee flexion/extension.
If this degeneration is allowed to continue, then the next stage can be moderate degeneration (OA)
Stage 2 – MODERATE KNEE CARTILAGE DEGENERATION (OA)

Symptoms of this level of damage include:
- Moderate Osteoarthritis
- Synovial fluid becoming more viscous, less elastic and more concentrated.
- ROM further decreased.
- Pain during all weight bearing with ROM.
By stage 2 (moderate knee joint degeneration), it is a long road to recovery. You should get expert advice from an appropriately qualified physician and find an experienced physiotherapist who can get you back on track as quickly as possible.
Assuming that you are in the mild stages of knee joint degeneration (which I find is most of my older clients) – the good news is that you can and should exercise with this level of degeneration and that exercise will improve the knee joint to better tolerate loads during every day activity.
A question often asked:
Why does the knee joint deteriorate so much in the first place?
This is a great question, and the answer is a combination of the aging process with lack of exercise as we age, increase in body weight (increased load on the knee with each step) and poor biomechanics as the main reasons why our knee joints start to fail us as we pass 50yrs of age.
When it comes to practical concerns with older knees, we see the following impairments:
1. ROM at Knee (often can’t straighten – 10o-30o limitation)
- This results in reduced capacity to take the legs through the ROM needed to perform every day activities.
- Research has shown that load within the joint creates lubricant, so without the loading/ROM through this final 10o-30o, joint lubrication reduces resulting in increased joint degradation and decreased mobility.
2. Lack of quad strength
- The quadriceps are a key leg muscle group to support the lower body through a range of movements (stepping, bending over, etc).
- If the quadriceps are not strong enough to support the lower skeletal system when loading (eg walking, running, lunging, squatting, etc), then much of the load will be directed towards the knee joint and without the associated muscular support, further degeneration of the joint (and associated pain) will take place.
3. Lack of External Rotation hip strength
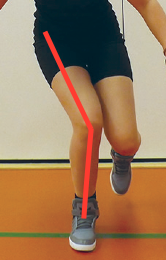
- Biomechanically, the knee is in a precarious position within the lower body.
- Internal rotation of the femur is quite a stable hip position to apply force, BUT leads to a poor knee angle (Knee Valgus) resulting in increased stress of the patellofemoral joint, medial collateral ligament and lateral meniscus (see image).
.
KEY STEPS TO IMPROVED FUNCTION (improved knee stability):
Must limit;
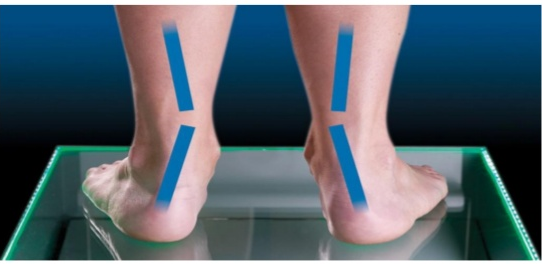
1. Ankle pronation
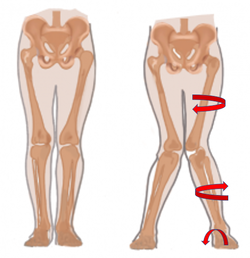
(if you have poor foot biomechanics (see image), it is important to have this issue reviewed and corrected as soon as possible. I am continually amazed at the incorrect shoe choices by clients who buy what looks nice but has limited ankle stability.
2. Knee valgus
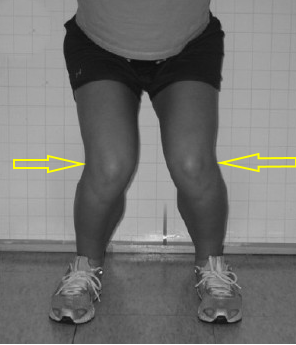
This is where you see a buckling in of the knees when squatting, lunging. This position is largely driven by a weakness in the external hip rotators and is accompanied by the internal rotation of the femur.
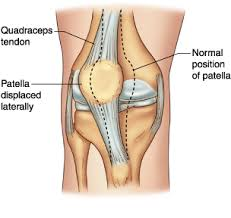
This position places HUGE stress/strain upon the knee joint, in particular the Patellofemoral joint (where the patella (knee cap) sits in a groove at the end of the femur – this knee valgus can result in the patella moving out of alignment causing severe kneecap/knee pain.
.
.
3. Excessive inward rotation of the femur
This movement can lead to all the lower limb issues mentioned above. Typically poorly developed external rotators at the hip joint are what cause this issue.
Also this is a movement that you can focus on limiting – Keeping correct knee/foot alignment is a key cue I use with all clients when squatting/lunging.
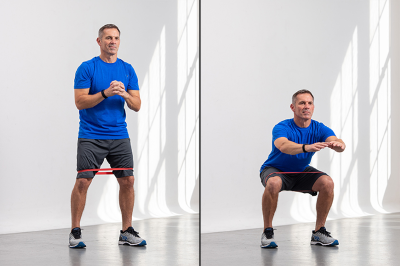
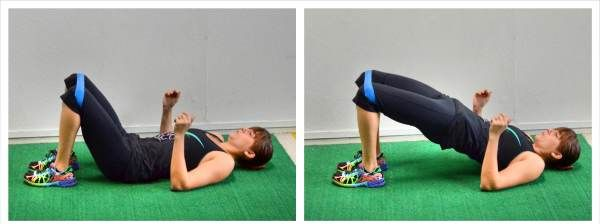
A rehabilitation program that has become very popular is the use of therabands whilst squatting & hip thrusting – this allows you to focus on ensuring limited internal rotation of the femurs and strengthening of the hip external rotator muscles groups.
Assuming you have addressed the above potential biomechanical issues, you won’t magically be pain free, but you don’t need to be to improve your knees and hopefully resume quality exercise.
.
TRAINING WITH PAIN!
It is important to understand that you can exercise/function normally with pain – as long as it is low level pain (either chronic or acute).
Try to measure any knee pain with a scale of 0-10 (0=no pain, 10=maximal pain)
Train with pain up to 3 – stop when greater than 4
Recovery post exercise is key to improvement. You can train daily as long as your pain rating stays below 4 the day after a training session or activity.
Train any range that doesn’t hurt.
ISOMETRIC CONTRACTIONS:
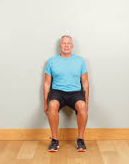
If the pain is >3 at a particular angle or range of angles (eg 30o-40o), try isometric contractions in this range (hopefully you can move your knee into this painful range) and perform a stationary squat/lunge/wall sit, etc with pain rating no greater than 3.
Start with two leg loading moving to one leg loading as you see improvement over time.
Jumping is good if no pain – no limitation on this exercise.
REAL WORLD EXAMPLE:
I work with a client (mid 60’s) who had quite bad knees that hurt whenever he attempted any form of squatting, leg extension or stepping activity.
We started on a hack squat machine with no weight (bodyweight only) and a very limited ROM (no more than 15o). We reviewed how the knees tolerated the load each day and he was only able to increase the total number of repetitions complete if the pain was <4.
Once he was able to reach 15 repetitions at this limited range the next step was to slowly increase the ROM until he was able to complete 3 sets of 15 repetitions with 75o knee ROM.
The final stage has been to add weight to the exercise and as of the time of writing this article, he completed 3 x 15 repetitions to 75o ROM with 40kg on the hack squat machine (and significantly less day to day knee pain).
SUMMARY REHABILITATION PLAN:
1. Check for instability in ankle (Pronation, tibial torsion), Femur (Internal rotation, femoral torsion), quad strength & external hip rotator strength (Gluteus maximus, Gluteus medius, Piriformis, Quadratus femoris).
2. Put together a program that deals with the strength issues with all the above muscle groups. (eg bands with squats – focus on external rotation, hip thrusts with bands, etc).
3. Train with as much ROM as possible (max 3/10 pain).
4. Apply Isometric conditioning within range that hurts (as long as max 3/10).
5. Repeat only when pain reduces to below 4/10 on any given day.
6. If possible, apply basic plyometrics (eg skipping, stiff ankle bounds) with minimal ROM through knee joint.