Since writing an article on the use of the Abdominal Stability Feedback device, there has been some interest in what sort of exercise progression should be adopted to safely take a client through core testing and subsequent core training?
This article will outline the 7 Stages I would suggest you take a client through (or go through yourself) to determine the level of your core stability.
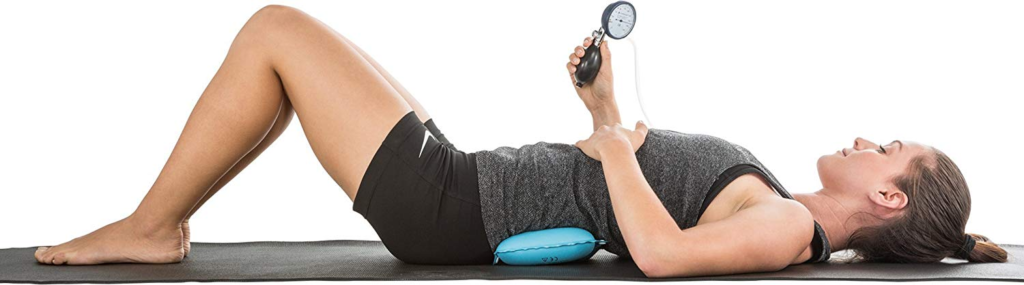
As a refresher – the Abdominal Stabiliser is an air pressure cuff placed directly under the small of the lower back and is attached to a pressure dial.
The premise of the device is that as you move your legs off the floor your core should have adequate strength to ensure that there is no anterior rotating of the pelvis (anterior rotation indicates an overuse of the hip flexors and under use of the core musculature in supporting the legs).
If the hip flexors successfully pull on the top of the pelvis/lower back, the pelvis will rotate anteriorly (in the above image the lower back will rise off the floor) and it will be impossible to maintain the pressure you were previously exerting on the pressure cuff.
Prior to starting the testing protocol outlined below – A simple initial test can provide some insight into the level of core control you or your client might have.
Start in the above position with the cuff partly filled with air (this is one factor that you will need to experiment with – how much air do you put into the cuff? The more air, the easier the exercises). Ultimately you want to have almost no air in the cuff at all – this will truly indicate the level of core strength you or your client possesses.
The contraction you are after is core bracing (Core-bracing-for-pelvic-stability/) Whereby you contract your obliques and try to flatten your stomach (contract your belly button to the floor).
Try to contract using the above method and maximally press on the cuff (dial >100) then immediately reduce the pressure back to zero and repeat. A sign of good core control is the ability to be able to increase and decrease the pressure from 0 to 100 back to 0 quickly and effortlessly.
This can be an early test/core training routine to be used even before even initiating the following protocol steps.
ABDOMINAL TESTING PROTOCOL:
The following LEVELS should be undertaken until you determine the level of your or your client’s core strength.

Level 1 – Knees bent, feet flat on the ground. Client contracts their core, generates pressure to ~40-50kpa and then they try to lift one leg off the ground whilst maintaining this pressure. If they are able to complete Level 1, move to level 2.

Level 2 – Starting position as Level 1, have the client try to lift one leg then immediately lift the second leg (in a galloping fashion) then place both back on the ground – keeping the pressure constant. If they are able to complete level 2, move to level 3.

Level 3 – Starting position as Level 2, have the client lift one leg, but instead of placing it back down on the ground, have them slowly extend their leg horizontally until straight (or they can’t maintain ~40-50kpa pressure). Test both legs. If they are able to complete level 3, move to level 4.

Level 4 – Have the client start with their feet in the air – hips and knees at 90o. Generate the above pressure, then slowly extend one leg horizontally. If they can extend their leg completely (keeping it off the ground), then slowly start extending the second leg until the pressure can’t be maintained. If they are able to complete level 4, move to level 5. (this is where most people will get stuck – the end position of this exercise places maximal load on the core with pelvic stability)

Level 5 – Have the client start as per level 4, this time move both feet horizontally until they are unable to maintain the above pressure. If they are able to complete level 5, then move to level 6.


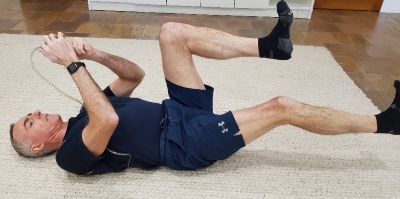
Level 6 – Start with hips at 90o and feet directly into the air. Slowly lower one leg to within 10cm of the floor – if they are able to achieve position whilst maintaining core pressure, then start moving the second leg towards the floor (keeping the first leg stationary at 10cm off the floor). Stop the test once they can’t maintain pressure. If they are able to complete this test then they are ready to be tested with the final protocol – Level 7.

Level 7 – Starting position as level 6, this time both legs are lowered at the same time – as soon as they are unable to maintain their core pressure, the test is over and the angle reached is recorded. This angle is what should be used to determine the quality of their core strength.

During Level 7 testing, the following angles achieved whilst maintaining core pressure can be used to assist with exercise selection.
>65o – Poor Core Strength
35-65o – Average Core Strength
<35o – Good Core Strength

If you or your client are unable to reach this final level (7) of testing (and are unable to score close to 35o), then you/they should not be prescribed any core exercises that load the hip flexors, such as:
- Feet held down situps
- Extended plank
- Core roller
- Anything beyond very basic roman chair leg raises.
- Any form of leg lowering exercises (arms supported or otherwise).
Without adequate core strength, all these above exercises will load the hip flexors, which in turn will place large shearing forces on the lower back and Sacro-Iliac joint (sacrum attached to Pelvis) and should be avoided until you/they have progressed through the above levels and can achieve near to 35o at Level 7.
Angle Performance
90o-65o – Low core stability – you should limit exercises that require using your hip flexors (limit leg lowers, hip flexor activities (Roman chair) & any supported situp activities (incline situps).
Stick to crunches, planks and certain Swiss ball varieties.

65o-35o – You have “Average” core stability – this will allow you to safely include some hip flexion activities (eg roman chair, controlled leg lowers) but you should restrain from performing any extended core loading movements (see <35o exercises).

<35o – Your core is strong and you can handle most advanced core strength activities (Russian twists & variations, Prone reach or rollout movements, advanced medicine/Swiss ball core loading movements).

The goal of every serious gym user should be to get their core to <35o strength during the Level 7 testing protocol. This will maximise the protection of your core and ensure you get the most out of your strength routines over the long term.
For a visual display of how to use the Ab Biofeedback Device – Please see my youtube clip.